Unibill is a one stop solution for in App purchasing in Unity®; a single plugin that works across the Apple App store, Mac App Store, Google Play, Amazon App store, Samsung Apps Store, Windows Phone 8 and Windows 8.1!
The following snippet initialises Unibill, makes a purchase and works across all seven platforms.
Unibiller.onBillerReady += (state) => {
    if (UnibillState.SUCCESS == state) {
        Unibiller.initiatePurchase(Unibiller.AllPurchasableItems[0]);
    }
};
Unibiller.Initialise();
Instead of using the raw billing interfaces of Apple, Google, Amazon and Microsoft, your application uses the more abstract Unibill interface. Unibill is responsible for communicating with the underlying billing system on each platform, so your code remains simple and clean.
Unibill does a huge amount of work for you, such as verifying your product data with Apple and Amazon when your application launches, and maintaining a database of what a user has purchased.
Unibill automatically integrates with your project, generating and merging your AndroidManifest and XCode projects as required. Changing between Google Play and Amazon billing is as simple as changing a drop down; Unibill handles everything else for you!
The first step is to tell Unibill what purchasable items your application has; the coins, potions, planets or subscriptions that you will be selling to your users.
By doing this first, Unibill can help you upload your purchase metadata to Apple & Google, by generating a bulk upload file describing your purchases.
You define your purchases using the Inventory Editor, a Unity editor window which you can find in the ‘Window/Unibill’ toolbar menu.
Your inventory is tracked in a JSON file located at Assets/Plugins/unibill/resources/unibillInventory.json.txt.

| Consumable | Can be purchased repeatedly. Suitable for consumable items such as virtual currencies. |
| Non Consumable | Can only be purchased once. Suitable for one off purchases such as extra levels. |
| Subscription | Has a finite window of validity. |
This uniquely identifies your item to Unibill across all platforms, and is the id you should supply when calling Unibill methods.
By default Unibill assumes that you use the same identifier on each specific billing system (Apple, Google etc).
When this is not the case, you can tell Unibill what identifier your item has on each platform by expanding the platform details for the item and 'overriding' the id.
The name of the purchasable item, as you display it to users.
This field is used when generating the bulk upload files for Apple's platforms and Google Play.
This field is used when generating the bulk upload files for Apple's platforms and Google Play.
If you wish to update your catalogue of products dynamically, without having to update your application, you have two options.
When initialising Unibill, you can supply a list of additional products that are available to purchase.
Unibill treats these products the same as those defined statically, retrieving their localized details and making them browsable with the normal inventory methods.
When calling Unibill methods you should refer to these dynamic products using the identifier of their ProductDefinition instances.
public class ProductDefinition {
    public string PlatformSpecificId { get; }
    public PurchaseType Type { get; }
}
Used as follows
var prods = new List<ProductDefinition>() {
    new ProductDefinition(
        "a.product.identifier",
        PurchaseType.Consumable
    ),
    new ProductDefinition(
        "another.product.identifier",
        PurchaseType.NonConsumable
    )
};

Unibiller.Initialise(prods);
With hosted configuration, you host your UnibillInventory json file at a URL, and Unibill will try and fetch an updated inventory at launch. This facility is enabled and configured in the inventory editor.

Note that the updated configuration is not used immediately, but on the following launch.
Unibill uses the PurchasableItem type to represent an item for sale.
This type includes a number of fields describing the item, some of which are from the inventory editor and some of which are retrieved from the billing system, such as localised fields.
| Name | Description |
|---|---|
| Id | The platform independent unique Unibill Id for this PurchasableItem. |
| PurchaseType | Consumable, Non Consumable or Subscription |
| name | As configured in the inventory editor |
| description | As configured in the inventory editor |
| localizedPriceString | A price string formatted with currency symbol for user display. |
| localizedTitle | The localised name of the item. |
| localizedDescription | The localised description of the item. |
| isoCurrencySymbol | The ISO 4217 currency code. |
| priceInLocalCurrency | A decimal price in the user's local currency. |
| receipt | A purchase receipt, if the item is owned, with platform specific schema. |
Unibill sends messages to your Application asynchronously; once you have initialised Unibill, they can be received at any time.
As a result, it is imperative that you subscribe to Unibill's events before you initialise Unibill.
This event notifies your App that Unibill has finished intialising
public static event Action<UnibillState> onBillerReady;
The UnibillState parameter takes the following values
| UnibillState | Description |
|---|---|
| SUCCESS | Unibill encountered no problems and is ready to make purchases |
| SUCCESS_WITH_ERRORS | Unibill encountered one or more non critical errors and is ready to make purchases. Details of these errors will have been printed to the console, or you can retrieve the errors manually via the Unibiller.Errors property. |
| CRITICAL_ERROR | Unibill was unable to initialise. Details of the error will have been printed to the console, or you can retrieve them manually. You should not attempt to make any purchases. |
This event is fired when a purchase succeeds.
public static event Action<PurchaseEvent> onPurchaseComplete;
The PurchaseEvent has the following properties
| Name | Description |
|---|---|
| PurchasedItem | The item that has been purchased. |
| Receipt | The purchase receipt, issued by the billing system provider (Apple, Google etc). |
| TransactionId | A unique identifier for the transaction, issued by the billing system provider (Apple, Google etc). |
This event is fired when a user cancels the purchase confirmation screen displayed by the billing system.
public static event Action<PurchasableItem> onPurchaseCancelled;
This event is fired when a user agrees to the purchase confirmation screen, but the a problem is encountered during the purchase.
Typically this fires if a card is declined or if the network is down.
public static event Action<PurchasableItem> onPurchaseFailed;
This event is fired when a user's purchase has been refunded.
This will occur if you issue a manual refund.
public static event Action<PurchasableItem> onPurchaseRefunded;
This event is fired after a call to Unibiller.restoreTransactions();.The parameter tells you if the restoration process was successful.
public static event Action<bool> onTransactionsRestored;
The following properties list all items for sale, optionally filtered by type (Consumable, Non Consumable, Susbscription).
Unibiller.AllPurchasableItems;
Unibiller.AllNonConsumablePurchasableItems;
Unibiller.AllConsumablePurchasableItems;
Unibiller.AllSubscriptions;
You can retrieve a specific product if you know its Unibill Identifier.
Unibiller.GetPurchasableItemById("levelPack1");
You start the purchase process with the following method call, telling Unibill what the user wants to buy.
Unibiller.initiatePurchase("levelPack1");
Note that 'levelPack1' is a platform independent Unibill Id. When the process completes, one of the purchase events will fire.
When your App is installed on a new device, it is important that you give your users any content they have already purchased and are entitled to.
The restore transactions functionality lets you do this this by retrieving details of any Non Consumable purchases the user has previously made.
When this method is called Unibill will fire the purchase event for any items the user owns and is entitled to, the same as if they'd just been purchased.
You should not call this method on every launch; on iOS it will prompt for your password. Instead you should give the user the explicit option to restore by offering them a 'restore' button that calls Unibiller.restoreTransactions().
void Unibiller.restoreTransactions();
Unibill maintains its own local database of which items a user has purchased.
Use this method to find out whether a user has purchased a Non-Consumable item, or how many times a user has purchased a Consumable item
int Unibiller.getPurchaseCount("levelPack1");
Use this to clear Unibill's local database of purchases. Note that this will not reset Apple, Google et al's record of purchase.
void Unibiller.clearTransactions();
Each billing system provides a cryptographic purchase receipt which serves as proof of purchase and can be verified on a third party server.
Receipts are in JSON format with the following schema.
{
    "json":"[This is the original JSON returned by Google Play]",
    "developerPayload":"[If submitted with the purchase request]",
    "signature":"[Generated by Google Play]"
}
Receipts are base 64 encoded strings, the contents of which are iOS version dependent.
On iOS <= 6, Unibill provides the (deprecated) transaction receipt.
On iOS 7+, Unibill provides the App Receipt, which includes details of all purchases.
Receipts are base 64 encoded App Receipts.
Receipts are in JSON format with the following schema.
{
    "isSandbox": [boolean, true if against sandbox],
    "userId":"[The user's Amazon user Id]",
    "receiptId":"[The purchase receipt Id]"
}
Receipts are in XML format as specified by Microsoft here.
A sample receipt follows.
<Receipt Version="1.0" ReceiptDate="2012-08-30T23:08:52Z" CertificateId="b809e47cd0110a4db043b3f73e83acd917fe1336" ReceiptDeviceId="4e362949-acc3-fe3a-e71b-89893eb4f528">
	<ProductReceipt Id="6bbf4366-6fb2-8be8-7947-92fd5f683530" ProductId="Product1" PurchaseDate="2012-08-30T23:08:52Z" ExpirationDate="2012-09-02T23:08:49Z" ProductType="Durable" AppId="55428GreenlakeApps.CurrentAppSimulatorEventTest_z7q3q7z11crfr" />
	<Signature xmlns="http://www.w3.org/2000/09/xmldsig#">
		<SignedInfo>
			<CanonicalizationMethod Algorithm="http://www.w3.org/2001/10/xml-exc-c14n#" />
			<SignatureMethod Algorithm="http://www.w3.org/2001/04/xmldsig-more#rsa-sha256" />
			<Reference URI="">
				<Transforms>
					<Transform Algorithm="http://www.w3.org/2000/09/xmldsig#enveloped-signature" />
				</Transforms>
				<DigestMethod Algorithm="http://www.w3.org/2001/04/xmlenc#sha256" />
				<DigestValue>Uvi8jkTYd3HtpMmAMpOm94fLeqmcQ2KCrV1XmSuY1xI=</DigestValue>
			</Reference>
		</SignedInfo>
		<SignatureValue>TT5fDET1X9nBk9/yKEJAjVASKjall3gw8u9N5Uizx4/Le9RtJtv+E9XSMjrOXK/TDicidIPLBjTbcZylYZdGPkMvAIc3/1mdLMZYJc+EXG9IsE9L74LmJ0OqGH5WjGK/UexAXxVBWDtBbDI2JLOaBevYsyy+4hLOcTXDSUA4tXwPa2Bi+BRoUTdYE2mFW7ytOJNEs3jTiHrCK6JRvTyU9lGkNDMNx9loIr+mRks+BSf70KxPtE9XCpCvXyWa/Q1JaIyZI7llCH45Dn4SKFn6L/JBw8G8xSTrZ3sBYBKOnUDbSCfc8ucQX97EyivSPURvTyImmjpsXDm2LBaEgAMADg==</SignatureValue>
	</Signature>
</Receipt>
Receipts consist of the purchase Id string. Consult Samsung's IAP purchase guide for validation details.
There are certain scenarios where the App Receipt (provided by Unibill alongside a purchase on OSX and iOS 7+) will be missing or stale, whereby it does not reflect the latest state of purchased items.
Since the introduction of App Receipts in OSX and iOS 7, Apple has provided an API to retrieve the latest version of the App Receipt from Apple's servers.
Unfortunately it is not possible for Unibill to handle these scenarios automatically by refreshing the receipt, since Apple's RefreshReceipt has a number of failure scenarios; the API prompts the user for their username and password and additionally requires Internet access.
If receipt validation is essential to your application you will need to detect missing or stale receipts and prompt the user to agree to enter their credentials to refresh the receipt.
Note that Unibiller.getAppleExtensions() will return null on any platform other than the Editor, iOS and the Mac App store.
var appleExtensions = Unibiller.getAppleExtensions();
appleExtensions.onAppReceiptRefreshed += appReceipt => {
Debug.Log(appReceipt);
Debug.Log("Refreshed app receipt!");
};

appleExtensions.onAppReceiptRefreshFailed += () => {
Debug.Log("Failed to refresh app receipt.");
};
// This will prompt for the user's password.
appleExtensions.refreshAppReceipt();
Unibill features built in support for virtual currencies; Unibill will track the player’s balance, incrementing it when they buy more and providing methods to check, credit and debit their balance.
Currencies are defined in the inventory editor.
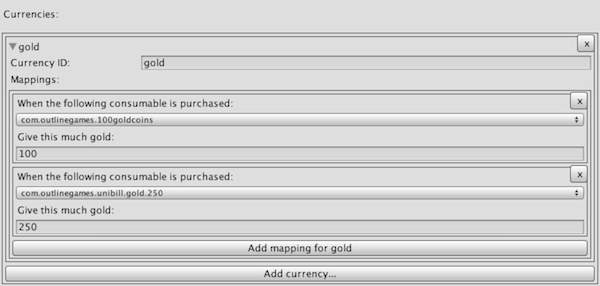
Use this to find out how much currency a user has.
decimal Unibiller.GetCurrencyBalance("gold");
Use this to debit a currency balance.
bool Unibiller.DebitBalance("gold", 100);
Use this to credit a currency balance.
Unibiller.CreditBalance("gold", 100);
The demo scene is at Assets/Plugins/unibill/scenes/unibillDemo.
The script that powers it is at Assets/script/UnibillDemo. Exploring this scene is a good way to understand how a Unibill application fits together.

The scene covers purchasing and restoring transactions.
You must enter your application’s public key in the ‘Google Play public key’ field of the inventory editor.
To get your application’s public key you must first upload a draft APK to the publisher console. You can find it’s public key under the ‘Services & APIs’ section for the application as the ‘Base64-encoded RSA public key’.
There are two ways to upload your metadata to Google Play
As of Unibill 1.1.4, Unibill uses Google Play billing V3. With Google Play Billing V3, both Consumable and Non Consumable items should be created as ‘managed’. Unibill will manage consumption of items for you; if you designate an item as being of type ‘Consumable’ within the inventory editor, Unibill will automatically consume the item once the OnPurchaseComplete event has completed. For details of how to manually define your purchases follow Google’s guide.
Unibill automatically generates a bulk upload CSV file for use with Google Play, located at Assets/Plugins/unibill/generated/googleplay/MassImportCSV.csv
Before publishing your application, you must test your in App purchases on an Android device.
In order to test you must publish your App as an Alpha or Beta distribution; testing from a draft published app is no longer supported by Google.
Note that whilst your Alpha or Beta APK must be published to test your IAPs, this does not mean your App has to be publicly available, ie visible in the Google Play store.
In order to perform a complete end to end test of your In App purchases, you must do so whilst signed into a device using a test account. For purchasing to work using a test account, note the following.
The Google Play Android application maintains its own cache of data pertaining to purchased items.
Unfortunately, it is possible for this cache to get out of sync with the authoritative version of what is owned, which is that maintained by Google's servers.This can manifest itself as a 'You already own this item' error when attempting to purchase an item, when a previous purchase attempt was interrupted for some reason.
This can be resolved by clearing the Google Play Application's data cache under Application Settings, then calling Unibiller.restoreTransactions().
You must enter your purchase metadata into the Amazon developer portal manually; there is no bulk upload facility. To do this you should follow the guide.
The Amazon SDK features an SDK tester that assists you with testing your purchases before you submit your app for review, documented here.
The SDK tester is a separate Android application that must be installed onto a test device alongside your application; you can install it from the Amazon App Store. You must then select the ‘Use sandbox environment’ checkbox in the Unibill Inventory Editor
When this box is ticked Unibill will automatically generate a JSON metadata file describing your purchases and write it to your device’s SD card when initialising. Be sure to untick this box before building the release version of your application.
You can use the Amazon SDK tester to thoroughly test your application, covering such scenarios as in app purchasing being disabled or otherwise unavailable. Simple launch the Amazon SDK tester application on the device to configure your test scenarios.
You must enter your Application’s ‘SKU’ into the ‘iOS SKU’ field of the inventory editor, as it is configured in iTunes Connect
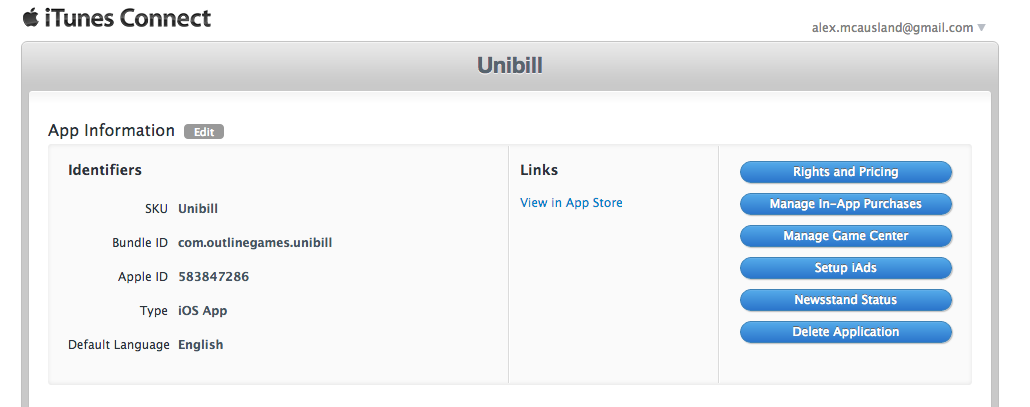
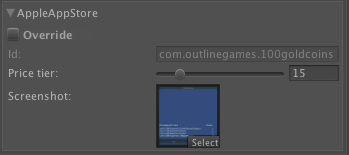
This field is only relevant if you will be using the Application Loader and bulk upload template to enter your purchase metadata into iTunes Connect. On iOS, prices are structured in tiers. You can set a purchasable’s tier using the slider within its ‘Apple App Store’ section.
On iOS, every In App purchase has to have an associated screenshot when being submitted to Apple for review. Unibill can help you prepare and submit these screenshots when using the Application Loader.
When running your application you can take a screenshot using ‘Window/Unibill/Take Screenshot“; screenshots are written to Assets/Plugins/unibill/screenshots/. The screenshot is taken of your game view; be sure you are running with a supported iTunes Connect screenshot resolution, such as 480 x 320 or 960 x 640.
You can then associate these screenshots with your purchasable items by assigning them to the ‘Screenshot’ fields in the Inventory Editor:
Apple’s Application Loader lets you upload various aspects of your application to Apple, including binaries and details of your In App Purchases.
Unibill automatically generates a tab delimited bulk upload file describing your purchases, suitable for use with the Application loader. You can find this file at Assets/Plugins/unibill/generated/storekit/MassImportTemplate. You can read the complete guide to the Application Loader here.
Please note that it may take several minutes between uploading your metadata and the metadata appearing in iTunes Connect.
Also note that subscriptions cannot be created using this method – they must be created manually in iTunes Connect.
iOS 8 introduced a new parental control feature; Ask to Buy
Ask to buy allows an In App Purchase to be deferred to a parent for approval. When this occurs, Unibill's onPurchaseDeferred event will fire.
Unibiller.onPurchaseDeferred += (item) => {
    // Let your user know an approval request has been sent, eg:
    yourUi.ShowMessage(item.localizedTitle + " is waiting approval!");
    // Continue your App's normal flow.
};
When the purchase is ultimately approved or rejected, Unibill's normal purchase succeeded/failed events will fire. See Apple's documentation for details on how you should handle this situation.
To test on an iOS device you must be using an iTunes connect test user account; you can create these accounts in iTunes connect, then sign out of the app store on the device. You will be prompted to log in when you attempt a purchase or restore transactions.
Do not verify the email address of your test iTunes connect account! Doing so will make the account invalid for testing with the Apple sandbox environment.
If your products are being returned as unavailable for purchase, follow this checklist.
Mac App Store purchasing follows a similar flow to that on iOS.
You must be a registered Mac developer, create your Mac App store application in iTunes connect along with your in app purchase metadata.
You cannot use the same product identifiers for both iOS and Mac App store apps. Therefore, you will need to use the ‘override id’ functionality in the Inventory editor to specify the unique Mac App store identifiers you have entered into iTunes connect.
When building a desktop Mac build you must select ‘Mac App Store validation’ within Unity’s build settings.
Once you have built your App, you must update its info.plist file with your bundle identifier and version strings. Right click on the .app file and click ‘show package contents’, locate the info.plist file and make the following modifications.
<key>CFBundleShortVersionString</key>
<string>1.0.0</string>
<key>CFBundleIdentifier</key>
<string>[Your bundle identifier eg com.outlinegames.unibill]</string>
<key>CFBundleVersion</key>
<string>1.0.0</string>
You can use the following commands to do the modification for you, if you'd like to incorporate this step into an automated build.
sed -i '' 's/unity.DefaultCompany.unity/your.bundle.identifier/g' your.app/Contents/Info.plist
sed -i '' 's/Unity Player version[^<]*/1.0.0/g' your.app/Contents/Info.plist
sed -i '' 's/[0-9]\.[0-9]\.[0-9][^<]*/1.0.0/g' your.app/Contents/Info.plist
Remove any meta files added by Unity (Important!)
Unibill includes an OSX framework bundle (unibillosx.bundle) which Unity interprets as a folder and pollutes with meta files, which prevents correct signing when bundled within your App.
find your.app/ | grep "\.meta$" | xargs rm
You must then sign, package and install your application. You will need to run the following commands from an OSX terminal:
Note that as of OSX Mavericks you will need to instruct signtool to sign Unibill's bundle, since Unity places it in a nonstandard location in your app, before signing the app itself, as follows.
codesign -f --deep -s "3rd Party Mac Developer Application: " your.app/Contents/Plugins/unibillosx.bundle
codesign -f --deep -s "3rd Party Mac Developer Application: " your.app
productbuild --component your.app /Applications --sign "3rd Party Mac Developer Installer: " your.pkg
In order to install the package correctly you must delete the unpackaged .app file before running the newly created package.
You must then launch your App from the Applications folder. The first time you do so, you will be prompted to enter your iTunes account details, for which you should enter your iTunes Connect test user account login. You will then be able to make test purchases against the sandbox environment.
You must sign, package, install your App and launch it from the Applications folder. If you do not do this you will not be able to make purchases.
You must not sign into the main App Store application using your test account or the test account will become invalid.
There are two ways to test on Windows Phone 8; using Unibill’s inbuilt support for the WP8 Mock IAP framework, and by creating a beta distribution of your app. Both methods require a Windows Phone 8 device.
To test using the mock IAP framework, simply check the “Use mock windows phone” checkbox in the inventory editor. When using the mock framework all purchases succeed. Be sure to uncheck this when publishing.
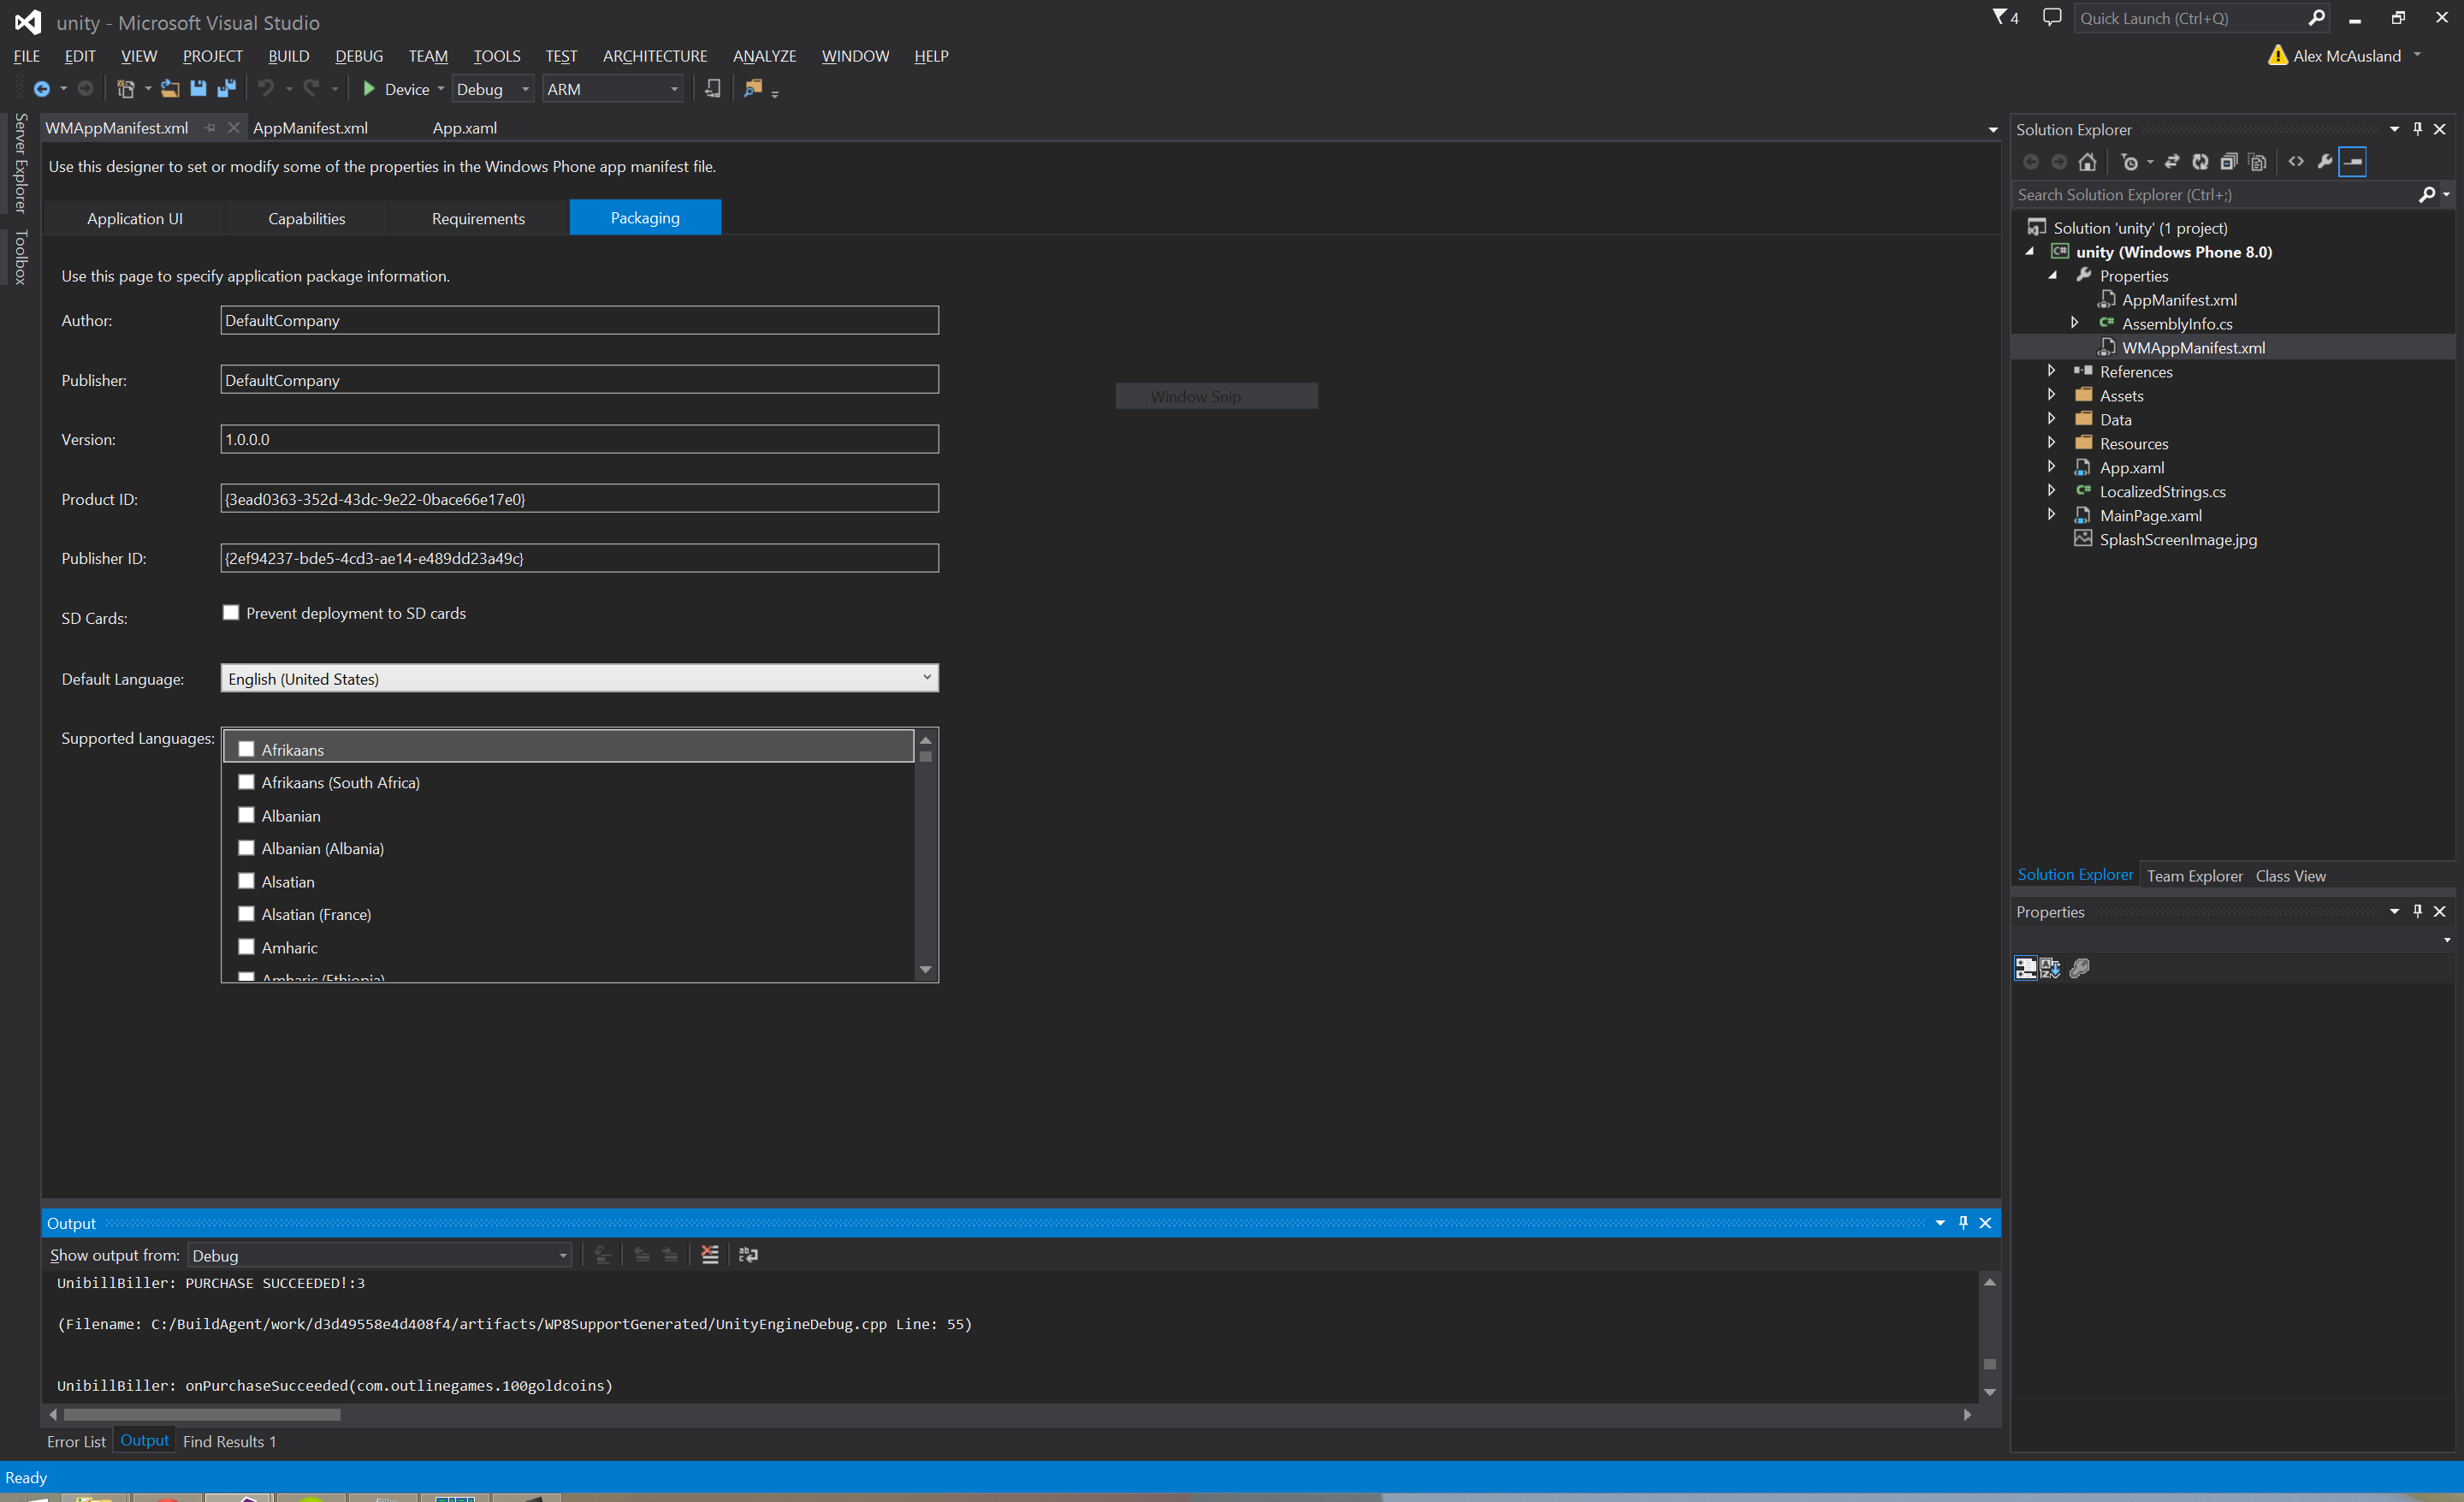
To test your App as a beta App, create it as a Beta distribution in the windows phone dev centre. You will need to enter your App ID and Publisher Id, which you can find in the microsoft developer portal, into the visual studio project Unity generates.
To test using the mock IAP framework, simply check the “Use mock windows 8″ checkbox in the inventory editor. Be sure to uncheck this when publishing.
To package and publish your app please follow this tutorial.
You must have a Samsung device with the Samsung Apps market app for testing on device.
You must register for a Samsung Apps seller account at seller.samsungapps.com, and enter your Samsung Apps Item Group in the inventory editor.
On Samsung Apps, your product identifiers are assigned for you by Samsung. You must tell Unibill what these identifiers are, by overriding the platform identifiers on samsung apps to these values, within the inventory editor:

In the inventory editor there are three modes that Unibill can run Samsung Apps in.
| PRODUCTION | Purchases are made against the live Samsung Apps service.You must select this mode to publish your APK |
| ALWAYS_SUCCEED | Purchases will always succeed and a developer popup will show |
| ALWAYS_FAIL | Purchases will always fail and a developer popup will show |
Unibill features an integration with Unity Analytics.
Simply install and initialise the Unity Analytics SDK and Unibill will automatically send accurate transaction information when purchases occur. There's no need to make manual calls to UnityAnalytics.Transaction(); any such calls should be removed.
If you are encountering errors pertaining to unibillosx.bundle check that Unity has preserved the correct platform settings, which should be for the 'standalone' platform only, as below.
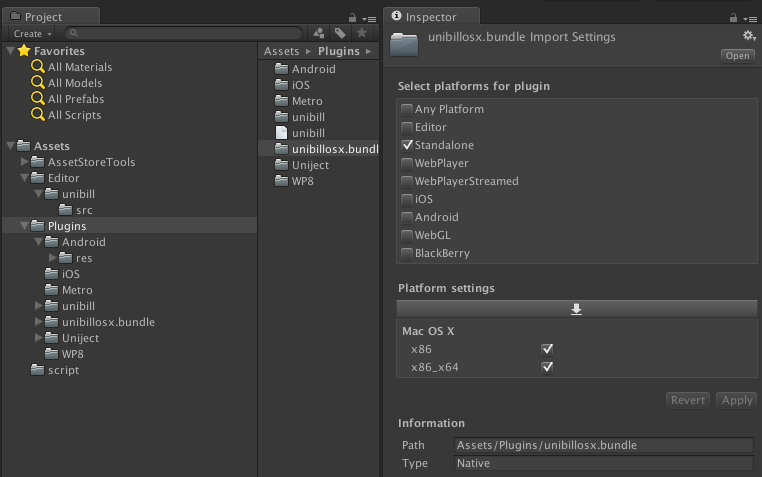
For all support requests please include a trace from a device (using adb/XCode/Visual studio etc) where possible
Please direct all support queries to support@outlinegames.com